
We use Edmodo as our classroom on the web. Each student must open an Edmodo account, & use the codes their teachers send them to join their class groups. All of their classes will appear on the left side of their Edmodo page (this is like the “hallway”), & they can simply click on each class to access its information. Announcements, quizzes, tests, & all communication are handled via Edmodo.
We use appear.in as our LIVE online platform. Students do not need to create an account. Each teacher will email their students the classroom’s link, & students will simply “knock” on the classroom door, to be allowed in.
To assist you in getting ready for your EOA classes, we have put together this technical help page. Follow these steps and you’ll be on your way to familiarizing yourself with the 2 platforms used in EOA.
Step 1: Setting up an Edmodo Student Account
Step 2: Joining a Group (Class)
Step 3: Editing settings
Step 4: Creating a Parent Edmodo Account
Step 5a: Viewing Grades and Assignments (under Parent account)
Step 5b: Viewing Grades (under Student account)
Step 6: Live classroom platform – Appear.in
Hardware & Software Requirements, Troubleshooting
Getting ready for your EOA Class!
Follow these easy steps to get ready for your EOA Class. If at any time you have any questions or need assistance, please contact techhelp@empowered.academy.
Step 1: Setting up your Edmodo student account
(If you already have an Edmodo Account, skip to Step 2)
If you have never created an Edmodo Account, you can create a new Student Account by following the steps below:
- Obtain a 6-digit Group Code from your teacher. (This code will be in your course syllabus that your teacher would have emailed to you).
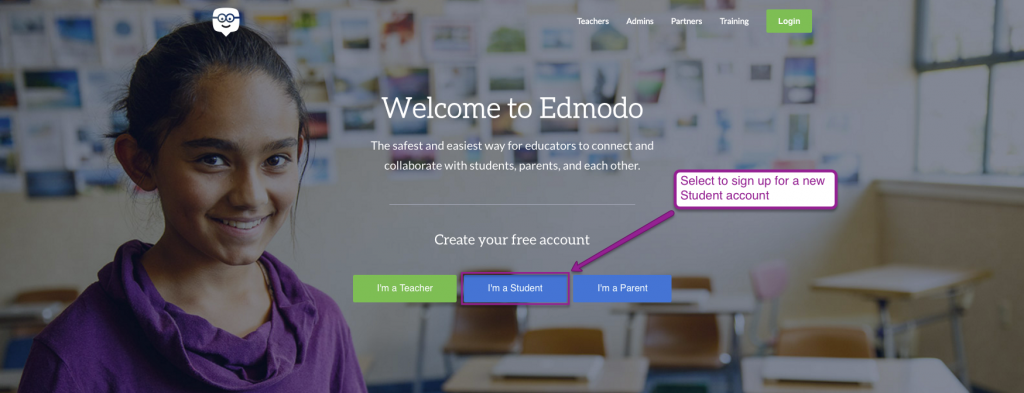
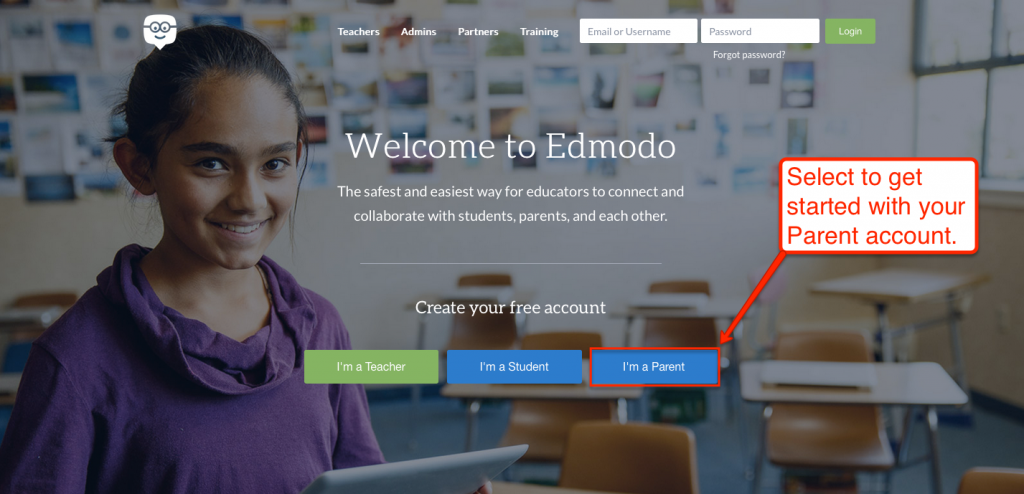
- Go to www.edmodo.com and click “I’m a Student.”
- Fill out the registration form with the Group Code, a unique username, and password. An email address is not required to sign up for a Student Account.
- Select the “Sign up” button to complete the sign up process.
Step 2: Join your Class Group
-
- Obtain a 6-digit Group Code from your teacher. (This code will be in your course syllabus that your teacher would have emailed to you).
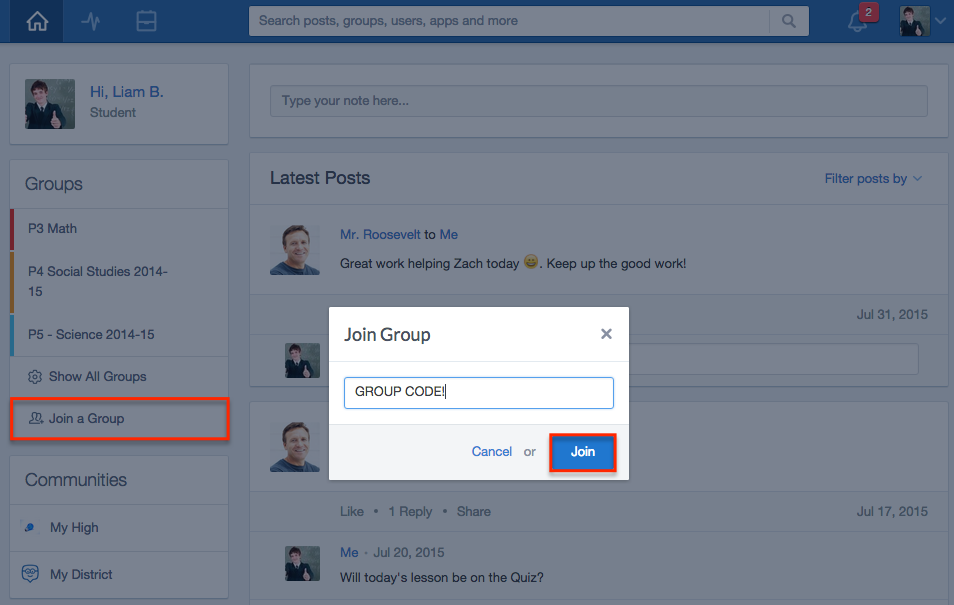
- Log in, and click “Join a Group” on the bottom of the Groups list, on the left of your Edmodo home page.
- Enter the Group code and click “Join.”
- If the Group Code is unlocked, you’ll be added right to the Group! If it’s locked, then you’ll be added to an approval queue and must wait for the Teacher or Co-Teacher of the Group to approve your join request.
Note: You only need one Student Account to join all your Groups
Here’s a video on how to set up a Student Account:
That’s all you need to set up your Edmodo account! If you want to edit some of your Edmodo account settings, go to step 3.
Step 3: Edit Your Account Settings
To update any personal information on your Account, including your email or password, or your email and text notifications, Account Settings is the place to go. To get started, you can access your Account Settings by following these steps:
-
-
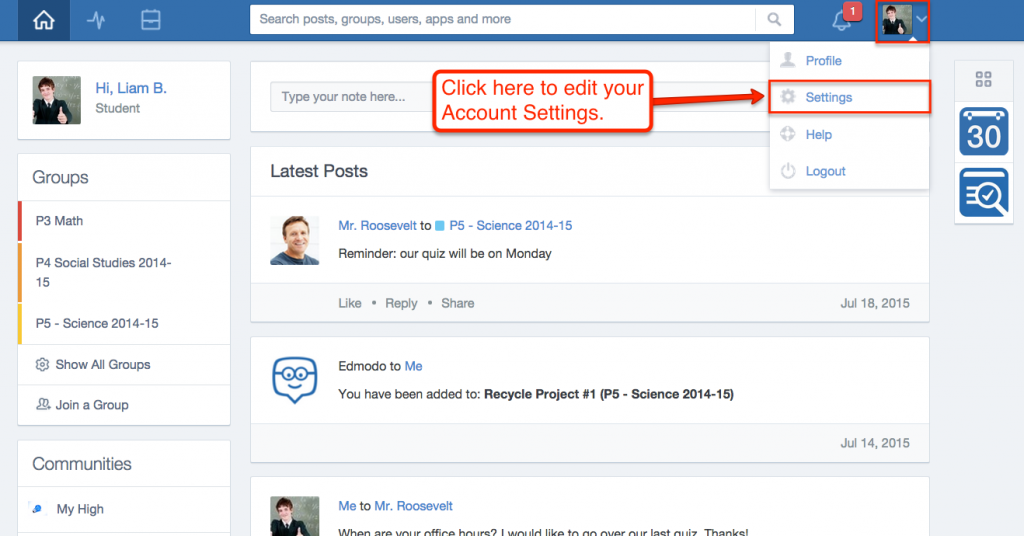
- Select the”Down Arrow” icon –
 – next to your profile picture from the right of your top toolbar.
 - Click the “Settings” option in the drop-down menu.
- Select the”Down Arrow” icon –
-
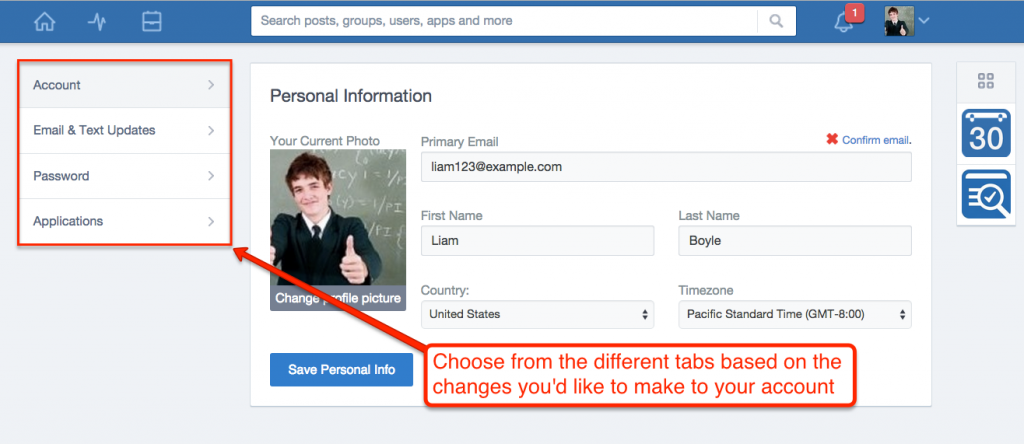
Account Tab:
-
-
- Profile Photo: Choose to upload a photo from your computer or customize your own avatar.
- Personal Information: Edit your first/last name (this is your display name.)
- Email address: not required, but recommended because it will help with resetting your password.
- Timezone (make sure your timezone is set to the same as your teacher’s timezone.)
-
Email and Text Notifications Tab:
-
-
- Notification Type: Choose email or text message from the drop-down list.
- Select the type of notifications you would like to receive by checking the box next to one or more of these choices: Notes, Assignments, Quizzes, Direct Messages, Replies & Follows, and Likes.
-
Password Tab:
-
-
- To change your password, enter your existing password and then your new password.
- Select “Change Password” to save the changes.
-
Step 4: Setting up a Parent Edmodo account
After your child has created a Student Account, you can create a Parent Account using your child’s unique Parent Code. You will not use a Group Code as Parent Accounts do not join Groups. Once you create your Parent Account, you are automatically observing any Group/class that your child is part of on his/her account.
You will need an email address to sign up for your Parent account. If your email addresses is in use on your child’s Student account, then you can remove the email address from the student account so that you can use it on your Parent account. Student accounts do not require an email address.
How to Sign Up as a Parent:
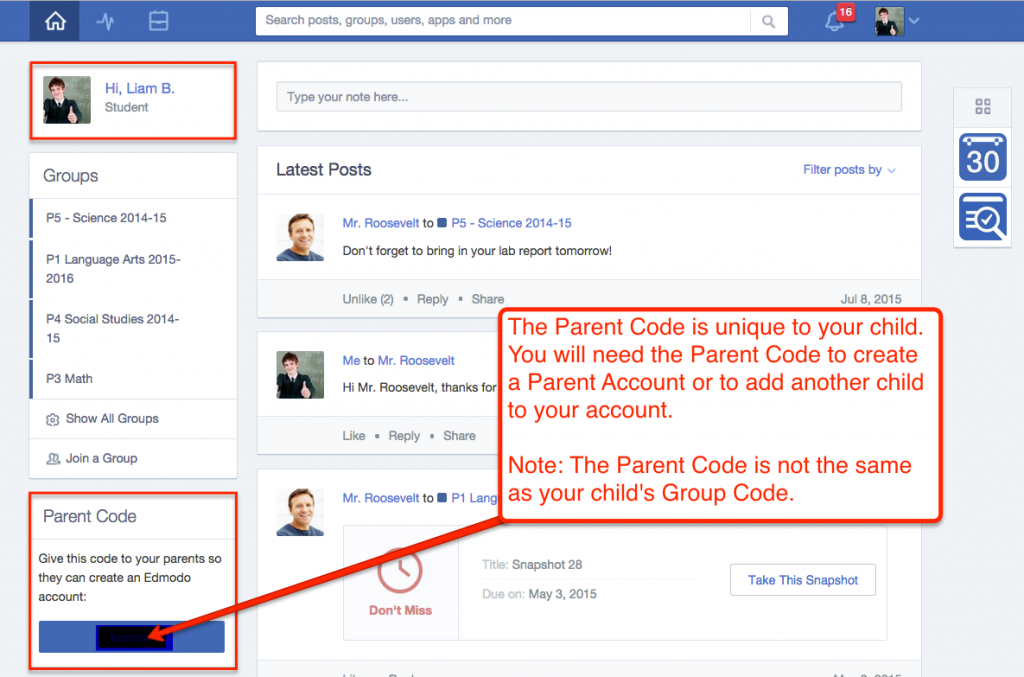
- Obtain the unique 6 or 7 digit Parent Code from your child’s account (this is not the same as your child’s Group Code/s).The Parent Code is attached to your child’s account. Each child has a different Parent Code. You can find your Parent Code the following ways:
- Your child’s Edmodo Homepage on a web browser (Chrome, Firefox, Safari, etc.): the Parent Code is located on the bottom of the left side panel in a blue box.
- Your child’s Edmodo account on an iOS app: click the three horizontal bars on the top left, then the Student’s name, and finally “Invite Parent.”
- Your child’s Edmodo account on an Android app: click the left side navigation drawer, then select “Profile.”
- Go to www.edmodo.com on a web browser (you can also sign-up with the Edmodo for Parents Android App and iOS Apps).
- Click “I’m a Parent.”
- Fill in the necessary information and your unique Parent Code, and check the box to agree to the Terms of Service and Privacy Policy.
- Click “Sign Up.”
You only need one Parent Account your entire time on Edmodo. Even if you have multiple children using Edmodo, you can add them all to your one account. There is never a need to create a new Parent Account (and there is never a need for your child to create a new Student Account either). If your child did create a new account, simply obtain the Parent Code associated with your child’s new account and add it to your existing Parent Account. As your child joins or leaves classes or schools, your account will automatically update to reflect these changes.
Note: Each child has a different Parent Code. You do not have to share a Parent Account with another parent, relative, or guardian. Multiple Parent Accounts can be set up for one student. Simply use the same Parent Code found on the student’s account to create a second Parent Account (must have a different email address).
Edmodo has an extensive support center. For more parent resources, please visit Edmodo’s support center here.
Step 5a: Viewing Grades and Assignments (parent account)
This information is available through the parent and student accounts and we count on homeschool parents to be actively involved in the oversight and management of their student’s learning.
We encourage parents to either login periodically, or even better, to devote spending time periodically with their student and have the student log in and navigate with you. This is a wonderful opportunity for you to have your child be the guide and take you into their class pages online and give you a tour of their class pages and show off their progress in the course. Kids appreciate being the expert, and working together with them as tour guide lets them know they are still accountable to you while allowing them to take ownership and responsibility for their learning. We recommend having them show you around as often as necessary depending on their age, experience in online classes, and previous demonstrated ability to work and manage their learning independently.
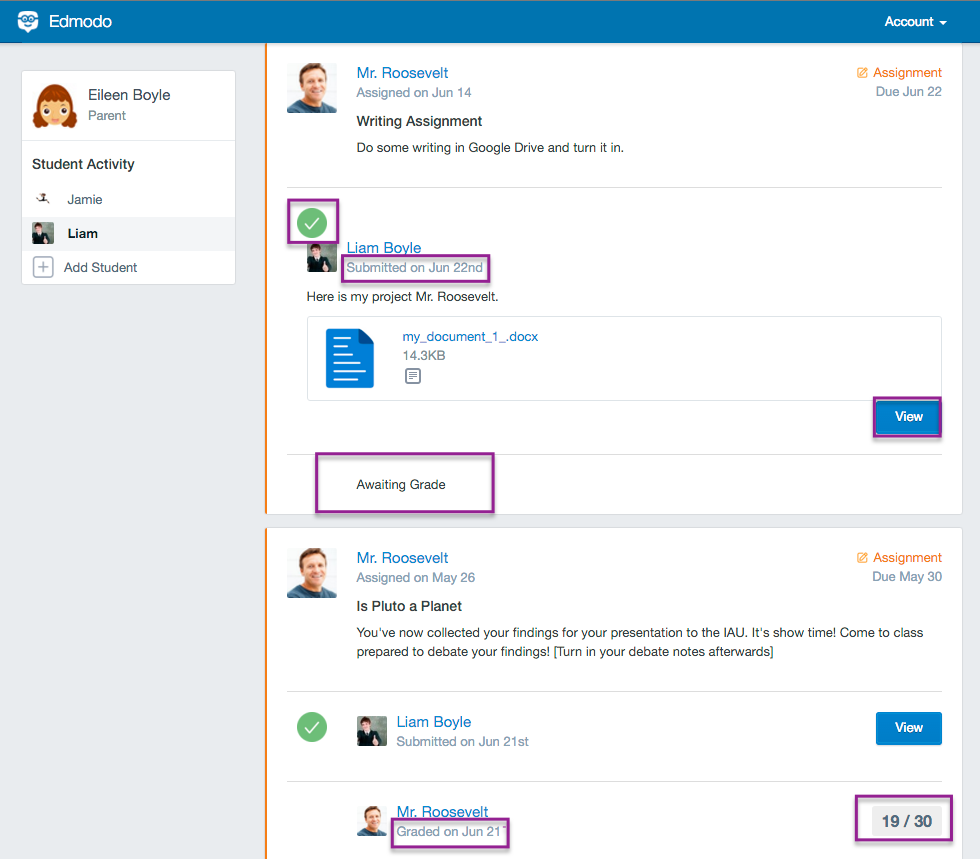
To view your Child’s grades on their Quizzes or Assignments, the “Assignments” and “Quizzes” tabs in the “What’s Due” section is the place to go! To do so, please do the following:
When you log-in, you will see the “What’s Due” tab. If you have more than one Student account on your Parent account, select your Child’s name from the Student Activity section on the left sidebar.
View the most recent activity from the “All” stream or specify the search by selecting “Assignments” or “Quizzes”
Note the following scenarios:
- If an Assignment has been submitted on Edmodo, you will see a green checkmark and the submission date.
- If an Assignment has not yet been graded by the Teacher on Edmodo, you will see “Awaiting Grade.”
- If an Assignment has been graded on Edmodo by the Teacher, you will see a score below your child’s Assignment submission. Click “View” to see what your child has submitted.
- If a Quiz has been taken on Edmodo, you will see a green checkmark and the submission date of the Quiz. You will also see a score below the Quiz.
Quizzes can include short answer questions which must be manually graded by the Teacher. If these question types are not yet scored, you will not see their points reflected in the Quiz score. You can see if the all of the questions have been answered by selecting “View” to see your child’s Quiz results including the questions and their answers.
Assignments
Quizzes

Step 5b: Viewing Grades and Assignments (student account)
Once your teacher has graded your Assignments and Quizzes, you’ll want to go to the Progress area to see your results. You can access your grades by doing the following:
Select the “Progress” icon![]() in the top toolbar.
in the top toolbar.
Select a Group from the menu.
Note: You can also get to the Progress page from your Student Profile by clicking the “Progress” tab.
What you will see:
- Your total points in the Group out of all possible points.
- A list of all Assignments and Quizzes and your grade for each. For Assignments and Quizzes that were handed in on Edmodo, you can click the item’s name to see the overview.
- The badges you’ve been awarded in your Group.
Step 6: Testing the Live Classroom appear.in Link and Troubleshooting

TECHNICAL REQUIREMENTS
- Hardware
- Personal computer or laptop with working microphone and webcam.
- Working printer with scanning ability
- Software
- Clearing Browser cache – this will be a process you need to become familiar with because it is often the cause of unexpected or intermittent issues. For additional information about clearing browsers, check here and find your browser for specific instructions.
For weekly class meetings you will need a computer or laptop with a working webcam, microphone and speakers. A headset is recommended.
Your hardware does not need to be brand new, devices that are a few years old usually work fine. However, it is important to have a strong, high speed internet connection.
You must also be home for class time, regularly each week. Connecting your computer or laptop to a public shared wi-fi space like the library will not work.
We are currently unable to allow students in class who are using app devices like ipads, phones and tablets (however we hope to add this option in the future!)
Basically, you must currently be using Google Chrome as your browser, and be connected on a computer or laptop in your home with high speed internet.
If you have any concern about your internet speeds, we can help you test them when you are ready to enroll. Just run a speed test and include it with your enrollment so we can tell you what to expect.
You can run a speed test at these locations, it is free and easy. Your internet provider may also have a similar test that they offer.
http://speedtest.googlefiber.net/
- Clearing Browser cache – this will be a process you need to become familiar with because it is often the cause of unexpected or intermittent issues. For additional information about clearing browsers, check here and find your browser for specific instructions.